I grabbed all of my supplies from Walmart - a plain brown wreath, spray paint, piece of white felt and a roll of burlap garland. The garland was 10 yards for only 5 bucks and I know I'll use it for a lot of other things as well.
I started with a plain jane wreath. I chose a plum color spray paint, thinking I could use this wreath throughout the year!
My yard and dining room table were my project spaces for this one, because my hubby was hogging the garage while cutting up his deer!
Just lay the wreath face down on your surface and spray away! Because of all the vines twisted and tangled, you really have to spray from all directions. I wasn't too picky about the back side. Flip it over and spray the front. I did a very heavy first coat, and that's all it took!
While the wreath was drying, I went to work on the burlap flowers. There are a million tutorials on how to make burlap flowers, but to be honest...it's all trial and error!
I started by cutting my burlap garland in half because it was 6'' wide. I cut strips about 18'' long.
Fold the strip in half...I dotted glue along the bottom half, then folded it over so it would stay while I was working with it!
You're GLUE GUN is your best friend for this project!
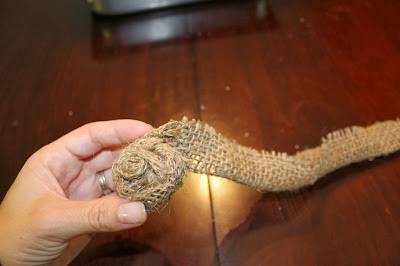
Next, start at one end and roll a few times and glue to hold it together.
From here - you just need to go for it. I rolled and twisted, and unrolled and untwisted until I got it how I wanted. There is more than one way to do this. I kept rolling and twist the burlap as I went. Use your glue gun frequently to help keep the rolls together and it will help you form it better!
I tried to keep the fraying edge down, and if I couldn't, I used the glue gun to tuck some loose strands in. Keep twisting, rolling and gluing until you run out of burlap. Glue the very end. If you need to trim off a little bit, that's fine.
I wasn't in love with my flowers at first, they aren't exactly alike...but that's fine :) Cut a round piece of felt, smaller than your flower and hot glue it to the back of your flower. This will help stick your flowers to the wreath better (sorry I didn't take a pic of this)!
You can spruce up the flowers by adding beads, buttons, etc. I found a random plastic pearl necklace and some old buttons that were in my great-grandma's sewing box.
I made 5 flowers total - 3 smaller ones (18'' long) and 2 bigger ones (24'' long). The great thing about a project like this, is you can do as many or as few as you want. I didn't have a wooden letter to add to my wreath, so I did a few more flowers.
Next, you need to make a big bow. THIS IS SO HARD :) Thank goodness my super-crafty Mother-in-law was over and
I'm happy with the finished product! I hope you craft away and get even more creative than I!
happy crafting :)


0 comments:
Post a Comment